Wednesday, June 17, 2009

Tweaking my methods

I haven’t written about sourdough bread in for forever, I know. It’s not that I’m not making bread, because I am. It’s just that I’ve said pretty much all I want to say about it. I’m fairly stable in my bread-baking routines, and stability is boring when it comes to writing.


My bread-baking routine is as follows. About once a month I get my starter out of the fridge and feed it for a day. The next day I bake two loaves, and I double the amount of starter so that the following day I have enough starter to bake six loaves. Depending on our need, freezing space, and my schedule, I may bake another six loaves on day three, or I may make bagels or some other specialty bread. Then the starter goes back into the fridge and I forget about it for several weeks.

Despite the lack of creativity, I do tweak my methods once in a while. I’ve read about all different kinds of sourdoughs and all different baking methods, and what I’ve learned has led me to suspect that sourdough bread is very forgiving and that rigorous schedules needn’t be followed to the letter in order to make good bread. So this last time I baked, I decided to shake my system up a bit and try something new. I mixed up a batch of country white bread (with some whole wheat thrown in), but instead of proofing it in the fridge overnight, I let it rest in the fridge for only a couple hours before pulling it out and allowing it to proof at room temperature for another couple hours before baking. It turned out lovely—sourdough bread in one day.

I’m not going to be updating this blog much anymore (that probably goes without saying), choosing instead to pour all my energies into the main blog, but I’m leaving this up as a resource. Which is all it really is anyway.

Happy baking!

Saturday, April 4, 2009

Burnished


Burnished. This was the word that popped into my mind when I made these bagels. If someone could’ve seen inside my head, they would’ve thought me certifiably psycho: They are soooo burnished! Shiny and burnished...glossily burnished. Sleekly and sexily burnished. Buuurnished.


These, hands down, are the best bagels I have ever made.


I have another recipe for bagels of the commercial yeast variety, and even though I like them a lot, invariably some of the bagel bottoms end up dense and gummy, like noodles. But these, well. I had not a single—not a single!—flop.


We tore into them while they were still warm. At first I was disappointed because the texture was more bread-like then chewy bagel-like. But after the bagels cooled to room temperature and sat for several hours, they transformed into delicious burnished chewy-nesses. And by day two they were even chewier.


This is one of the faster sourdough recipes. Just throw all the ingredients in the mixer (the recipe calls for a lot of starter, which is always a plus in my book because then I can get away with making just one recipe for the day and don’t have to feel like I need to make a variety of different breads just so I can use up all the starter), knead it for eight minutes, shape the bagels (it’s actually a fun activity and not a chore at all), put them on two trays, cover them well, and transfer them in the refrigerator to proof till the next day when it’s time to boil and bake them. After a brief dip in a pot of boiling water and fifteen minutes in a hot oven, they are done.


I will be making these beauts every time I do a round of sourdough baking. They are an essential bread, one I’ve resolved to have on hand at all times.

Bagels
Adapted from Nancy Silverton’s Breads from the La Brea Bakery

12 ounces (1 ½ cups) cool water
2 teaspoons yeast
13 ½ ounces (1 ½ cups) white starter
2 pounds (6 ½ cups) high-gluten flour or white bread flour
6 tablespoons wheat gluten (if not using high-gluten flour)
1/4 cup sugar
1 tablespoon salt
2 tablespoons barley malt syrup
6 tablespoons milk powder

Day One:
Put all the ingredients in your standing mixer and mix on low speed for one to two minutes. Turn the mixer up to medium speed and mix for another 8 minutes, or until a thermometer reads 75 degrees when plunged into the dough. Let the dough rest for ten minutes.

Line two baking sheets with parchment paper and sprinkle them with cornmeal or semolina flour.

Divide the dough into 18 four-ounce pieces. Roll each lump of dough into a 6-8 inch rope, then loop it around so that the ends overlap by about 1-2 inches. With the fat overlapping part of the bagel in the palm of your hand and the skinny part of the bagel over the back of your hand, press your hand down on the counter and roll back and forth, pressing the bagel ends together. (It’s much easier than it sounds.) Repeat with all the lumps of dough.


Place the shaped bagels on the prepared baking sheets, leaving an inch or two between each bagel.


Slip the sheets of bagels into a large bag, tie it shut, and put them in the refrigerator to proof for 12-24 hours.


Day Two:
Remove the bagels from the refrigerator, uncover them, and let them proof at room temperature for about 20 minutes.


Put about four inches of water in your widest (not deepest) kettle and bring it to a boil. (You may want to add something to the water to enhance the bagels, but it isn’t necessary. Brown sugar, baking soda, or salt are the most common additions, I think.) At the same time, preheat your oven (and baking stone, if using) to 450 degrees.

When the water is rapidly boiling, gently drop in three or four bagels. Boil for 20 seconds on each side, flipping them over with a slotted spoon.


Carefully remove the bagels, one at a time, from the water and place them, smooth side up, on the preheated baking stone (that you generously dusted with cornmeal after heating). Once your baking stone is filled, bake the bagels for 15-20 minutes.


Wait to boil the remaining bagels until the first batch is out of the oven since it is important to get the bagels out of the boiling water and into the oven as quickly as possible—you don’t want the boiled bagels to sit around at room temperature for too long.

They keep well at room temperature for two or three days. If freezing, cool completely before bagging.

Note: I'm submitting this post to Yeast Spottings.

Friday, March 13, 2009

Drunk on chocolate

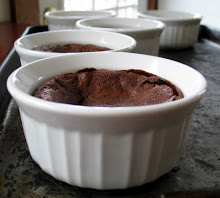
Like I twittered, I’ve been craving chocolate, so today I decided to make Silverton’s Warm Sourdough Chocolate Cake. I have no idea why I waited so long.


Let’s cut to the chase, shall we? News this good is not to be dilly-dallied with.


It’s a crazy simple recipe, really. All you need is fourteen ounces of bittersweet chocolate, the more expensive and high-end the better since the chocolate is the main ingredient. However, I didn’t follow directions and instead (it was all I had) used the bars of Hershey’s dark that my girlfriend picked up for me at a discount grocery—99 cents for a half-pound bar—and it still turned out intoxicating. Besides the chocolate, you’ll need three-and-a-half eggs, three tablespoons sugar, a quarter-cup of cream and a quarter-cup of starter.


That’s it.


Well, what are you waiting for? Snap to it!


Warm Sourdough Chocolate Cakes
Adapted from Nancy Silverton’s Breads from the La Brea Bakery

While supremely elegant, these cakes have no frills, and you may, if so inspired, wish to play around. I kept thinking a little booze might be nice, maybe in the whipped cream I spooned on top, or maybe in the batter itself. Or, if you’re not spirit-inclined, you could drizzle over some caramel sauce, or maybe artsily sprinkle about some red-raspberries.


These cakes are supposed to be baked in molds set on oven-safe dessert plates—then, after removing them from the oven, you simply slip off the molds (Silverton says tuna cans with both ends cut out of them will work fine), plate the hot dessert plate on a larger dessert plate and serve. I’m sure it would all be very elegant, but I used ungreased ramekins instead and they turned out just fine. I used four two-ounce ramekins and five four-ounce ramekins because that was all I had, but I think it would be better to use more of the smaller-sized dishes—these are some hefty-rich cakes and you only need a small amount to get your kicks.


The fantastic thing about this dessert is that it can be made ahead, maybe even a day or two, and stored in the fridge in the molds all ready to go into the oven. So you can have your fancy company over and towards the end of the meal you pop the cakes into the hot oven and start the coffee to percolating and by the time you’ve finished up your dinner, the molten cakes are coming out of the oven. Just dollop or dip the whipped or frozen cream, and there you have it.


I do not know how these cakes keep. You are supposed to eat them warm, but well, not everyone has enough people on hand to eat up all these little cakes as they come out of the oven. I had one (my second) at room temperature and it was lovely. I’m going to try refrigerating most of them and freezing a couple, just to experiment. Thawed and flash-baked, I bet they’ll be as good as new.

14 ounces bittersweet chocolate
1 whole egg
2 eggs yolks
3 egg whites
3 tablespoons sugar, divided (I used vanilla sugar)
1/4 cup cream
1/4 cup white starter (make sure there are no flour lumps)

Break the chocolate into pieces and microwave till melted, stirring every thirty seconds or so. Set aside, but do not let it get cold.

Whip the cream and put it in the fridge.

Whip the egg whites with one tablespoon of the sugar and set aside.

Using a mixer, beat the whole egg, the two egg yolks, and the two tablespoons sugar for about five minutes, until very thick and creamy.

Add half of the chocolate to the egg and sugar mixture, along with the starter and whipped cream. Stir gently, but well. Fold in the egg whites and then add the remaining chocolate.

Fill ungreased ramekins three-fourths full, set them on a baking tray, and bake in a 500 degree oven for five-six minutes. Only the edges will be softly set; the middles will still be quite jiggly and wet.

Serve warm, with whipped cream or vanilla ice cream.

Ps. For a fun bread blog (lots of sourdough), visit Yeast Spottings. I submitted this post to that site, so hopefully I'll be showing up there sometime in the near future.

Also, I'm starting a list of bread links in the sidebar. If you have a favorite bread blog, please send me the link so I can check it out. Thanks!

Update, April 4, 2009
I was right---these freeze beautifully. I just thawed one at room temperature and then heated it in the microwave for a few seconds, topped it with some homemade vanilla ice cream and some sour cherry sauce. I'm swooning.

Monday, March 2, 2009

Good holes


Slashing away at my mound of dough, readying it to shape into loaves, I was delighted to see the dough riddled with holes, proof that the natural yeast was hard at work.

Friday, February 27, 2009

All whole wheat

I attempted to make bread using just my freshly ground whole wheat. Actually, it wasn’t one hundred percent whole wheat because I did have to use some of my white starter. But I only used six ounces of the starter, to which I added three ounces of whole wheat and three ounces of water the night prior to making the bread.


The resulting bread tasted like, well, like wheat. It was earthy and dark and kind of strong tasting, almost like molasses. It was heavy, too, though it did rise, it didn't get very high. Mr. Handsome and I don’t care for it, and while the kids will eat it when I serve it to them, they don’t usually ask for seconds.

I will not be making this bread again, but now I’m left to wonder about those people who say they make their bread with only freshly ground wheat. Does it actually taste good? Am I doing something wrong?

Monday, February 9, 2009

Air Puffs

On Saturday I made Silverton’s recipe for sourdough donuts.


She describes them as “light” and “broichelike”, and while I don’t know much about broiche, I do know that these donuts were, by far, the lightest donuts I’ve ever sank (sunk? chomped?) my teeth into. They collapsed and melted away, almost as fast as cotton candy.

Not only were the donuts the airiest pastries ever, the recipe was like non-other. It called for ten tablespoons of butter, five teaspoons of cinnamon, two whole nutmegs, grated,


thirteen egg yolks,


as well as buttermilk, milk powder, starter, etc. (The recipe also called for dried sour cherries, but I opted not to use them.)

The dough was so moist it was more like a thick paste then a bread dough, and I ended up adding more flour then the recipe called for, but even so, the donuts fried super-fast—they were in and out of the oil in a blink of an eye.


We fried them up outside on the deck, kids crawling all over us, eating them up as fast as we could fry them. We hardly had any leftovers. (We did give a small bag of them to some friends, but most were eaten at the scene of the frying.)


Even thought these donuts were delectable, I still prefer my standard potato-dough donuts. Nonetheless! I would like to find an easy sourdough donut recipe, preferably one with a less-excessive ingredient list.


I guess that means more experimentation lies ahead of me. I’m not complaining.

Saturday, February 7, 2009

Understanding the concepts

I have written hardly anything about sourdough lately. I’m afraid you’ll take that to mean that I haven’t been doing any baking, which is not the case at all. Not only have I been baking, I have also been experimenting with my own recipes, reading up on the chemistry behind the sourdough, dreaming about having a masonry oven, and teaching others (albeit just one other, but that number should change to two after this coming week) how to make the bread.


After three years of off-and-on baking, I’m starting to get into a more moderate baking rhythm. I get my starter out of the fridge, feed it for a couple days (if it’s been in the fridge for just a couple weeks, it only takes one day to wake up), increase the amount of starter, do a several days of big bakings, and then put the starter back in the fridge for another couple weeks.

I’ve experimented with enough recipes that I know what my family likes best, so I’m more efficient, no longer spending large amounts of time trying out new recipes (though I think it’s because of the wide-range of recipes that I’ve made that I’m finally becoming more comfortable with sourdoughs).


I have done away with the whole wheat starter, not because we don’t like it, but because I think there should be a way to make a nutty whole wheat bread using the white starter, a bread that rises better and tastes a little less sour. Which leads me to my first experiment. One morning, just a couple weeks back, I increased the amount of starter that I reserve each morning (I normally keep back a half-cup which provides enough, after a full day of feedings, to make a batch of Country White, with a little starter left over) to one full cup, putting it in a gallon jar to give it adequate room to grow.

I gave the starter it’s accustomed third and final feeding right around suppertime, but then at bedtime I shook things up a bit. I poured out some of the starter into a quart jar and fed it again, a fourth time, but this time with whole grains and freshly ground flour. My hope was that the whole grains would absorb enough of the water that they would soften to provide a chewy, nutty texture to the final product. Likewise, I wanted the ground flour to have some time to ferment and sour, giving the bread a deeper, more complex flavor.

The following morning I scraped the whole-grain starter into the mixing bowl, and proceeded with the recipe for Country White. I substitute some whole grain flours to the bread in place of the white flour, but because I didn’t want to make too many changes at one time, the modifications were minimal.

The resulting bread is a whole wheat version of the Country White, just what I was hoping for, proving that I can indeed make a good whole wheat without a whole wheat starter and by following the standard recipe. Granted, the changes that I made were moderate ones, and I suspect that if I were to make substantial changes I would need to make other changes as well, such as upping the water or decreasing the salt, but for minor changes this method worked well, the key being to add some of the whole grains to the starter the night prior to mixing up the dough.


I have written down my changes into a recipe format, just for the sake of clarity and good record-keeping. Bear in mind that there is nothing magical about the grains I used. It’s the method that is important (though flexible) as well as the proportions of flour-water-starter. Once you understand those concepts, the sky is the limit.

Rye-Whole Wheat Sourdough

Day One
Several hours after the starter’s final daily feeding (in other words, right before you go to bed), measure out 6 ounces of white starter and put it in a quart jar. Add 2 ounces rye flour, 1 ounce rye flakes, and 3 ounces water. Stir well, cover lightly, and go to bed (both you and the baby).

Day Two
Mix up the dough as per the instructions for Country White. The proportions are as follows:

the jar of rye starter (12 ounces)
2 pounds and 2 ounces of flour: 1 ounce rye flour, 5 ounces whole wheat flour, and 1 pound 12 ounces white bread flour
1/4 cup wheat bran
1 pound 2 ounces water
4 ½ teaspoon sea salt

Day Three
Bake the bread.